16.6. CGI and Forms
Processing user input is one of the most common reasons for using a CGI script. This is normally done with forms. The form offers you a number of methods, called virtual input devices, with which to accept input. These include radio buttons, check boxes, pop-up menus, and text boxes. All forms are in HTML documents and begin with a <form> tag and end with a </form> tag. A method attribute may be assigned. The method attribute indicates how the form will be processed. The GET method is the default, and the POST method is the most commonly used alternative. The GET method is preferable for operations that will not affect the state of the server; that is, simple document retrieval and database lookups, etc., whereas the POST method is preferred for handling operations that may change the state of the server, such as adding or deleting records from a database. These methods will be described in the next section. The ACTION attribute is assigned the URL of the CGI script that will be executed when the data is submitted by clicking the Submit button.
The browser gets input from the user by displaying fields that can be edited. The fields are created by the HTML <INPUT TYPE=key/value> tag. These fields might take the form of check boxes, text boxes, radio buttons, etc. The data that is entered into the form is sent to the server in an encoded string format in a name/value pair scheme. The value represents the actual input data. The CGI programmer must understand how this input is encoded in order to parse it and use it effectively. First, let's see how input gets into the browser, by looking at a simple document and the HTML code used to produce it. The user will be able to click on a button or enter data in the text box. The input in this example won't be processed, thereby causing an error to be sent to the server's error log when the Submit button is selected. Nothing will be displayed by the browser. The default for obtaining input is the GET method.
A summary of the steps in producing a form is
1. | START: Start the form with the HTML <form> tag. The <form> tag is nested within HTML <body> </body> tags.
|
2. | ACTION: The action attribute of the <form> tag is the URL of the CGI script that will process the data input from the form.
|
3. | METHOD: Provide a method on how to process the data input. The default is the get method.
|
4. | CREATE: Create the form with buttons and boxes and whatever looks nice using HTML tags and fields.
|
5. | SUBMIT: Create a Submit button so the form can be processed. This will launch the CGI script listed in the ACTION attribute.
|
6. | END: End the form and the HTML document.
|
16.6.1. Input Types for Forms
Table 16.7. Form Input Types
| Input Type | Attributes | Description |
|---|
| CHECKBOX | NAME, VALUE | Displays a square box that can be checked. Creates name/value pairs from user input. Multiple boxes can be checked. |
| FILE | NAME | Specifies files to be uploaded to the server. MIME type must be multipart/form-data. |
| HIDDEN | NAME, VALUE | Provides name/value pair without displaying an object on the screen. |
| IMAGE | SRC, VALUE, ALIGN | Same as the Submit button but displays an image instead of text. The image is in a file found at SRC. |
| PASSWORD | NAME, VALUE | Like a text box, but input is hidden. Asterisks appear in the box to replace characters typed. |
| RADIO | NAME, VALUE | Like check boxes, except only one box (or circle) can be checked at a time. |
| RESET | NAME, VALUE | Resets the form to its original position; clears all input fields. |
| SELECT | NAME, OPTION SIZE, MULTIPLE | Provides pop-up menus and scrollable lists. Only one can be selected. Attribute MULTIPLE creates a visibly scrollable list. A SIZE of 1 creates a pop-up menu with only one visible box. |
| SUBMIT | NAME, VALUE | When clicked, executes the form; launches CGI. |
| TEXT | NAME SIZE, MAXLENGTH | Creates a text box for user input.
SIZE specifies the size of the text box. MAXLENGTH specifies the maximum number of characters allowed. |
| TEXTAREA | NAME, SIZE ROWS, COLS | Creates a text area that can take input spanning multiple lines. ROWS and COLUMNS specify the size of the box. |
16.6.2. Creating an HTML Form
A Simple Form with Text Fields, Radio Buttons, Check Boxes, and Pop-up Menus
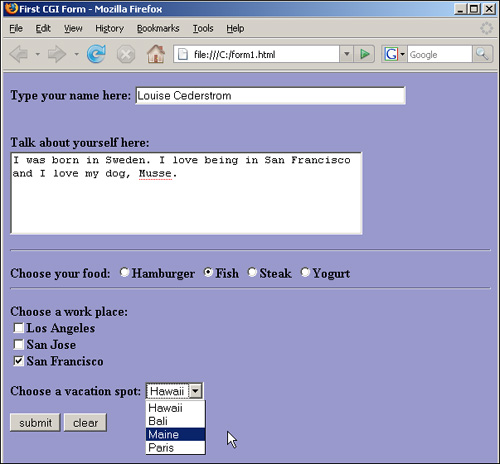
First, let's see how input gets into the browser, by looking at a simple document and the HTML code used to produce it. The user will be able to click on a button or enter data in the text box. The input in this example won't be processed, thus causing an error to be sent to the server's error log when the Submit button is selected. Nothing will be displayed by the browser. The HTML file is normally stored under the server's root in a directory called htdocs. If the HTML file is created on the local machine, then the file:/// protocol is used in the Location box with the full pathname of the HTML file, which would normally end with an .html or .htm extension.

Example 16.11.
|
Code View: (The HTML Form Source File)
1 <html><head>
2 <title>First CGI Form</title></head>
<body bgcolor="#9999cc">
3 <form action="/cgi-bin/bookstuff/form1.cgi" >
<p/>
4 <b> Type your name here:
5 <input type="text" name="namestring" size=50>
<p><br>Talk about yourself here: <br>
7 <textarea name="comments" rows=5 cols=50>I was born...
</textarea>
</b>
<hr>
8 </p><b> Choose your food:
9 <input type="radio" name="choice" value="burger"/>Hamburger
<input type="radio" name="choice" value="fish"/>Fish
<input type="radio" name="choice" value="steak"/>Steak
<input type="radio" name="choice" value="yogurt"/>Yogurt
<hr>
</p> <b>Choose a work place:</b> <br>
10 <input type="checkbox" name="place" value="la"/>Los Angeles
<br>
<input type="checkbox" name="place" value="sj"/>San Jose
<br
<input type="checkbox" name="place" value="sf" checked/>San Francisco
</p>
<b>Choose a vacation spot:</b>
11 <select name="location"> <option selected value="hawaii"/> Hawaii
<option value="bali"/>Bali
<option value="maine"/>Maine
<option value="paris"/>Paris
</select> <p>
<input type="submit" value="submit">
<input type="reset" value="clear">
</body>
</form>
</html>
This tag says that this is the start of an HTML document. The <TITLE> tag; the title appears outside of the browser's main window. The beginning of a <FORM> tag, followed by attributes that specify where the browser will send the input data and the HTTP method that will be used to process it. The default method is the GET method. When the data is submitted, the CGI script will be executed by the server. The CGI script is located under the server's root directory in the cgi-bin directory, the directory where CGI scripts are normally stored. In this example, the cgi script is stored in a directory called bookstuff, below the cgi-bin directory. The <P> tag starts a new paragraph. The <B> tag says the text that follows will be in bold type. The user is asked for input. The input type is a text box that will hold up to 50 characters. When the user types text into the text box, that text will be stored in the user-defined NAME value, namestring. For example, if the user types Louise Cederstrom, the browser will assign namestring=Louise Cederstrom to the query string. If assigned a VALUE attribute, the text field can take a default; i.e., text that appears in the text box when it is initially displayed by the browser. The user is asked for input. The text area is similar to the text field but will allow input that scans multiple lines. The <textarea> tag will produce a rectangle (name comments) with dimensions in rows and columns (5 rows by 50 columns) and an optional default value (I was born...). The user is asked to pick from a series of menu items. The first input type is a list of radio buttons. Only one button can be selected. The input type has two attributes: a type and a name. The value of the name attribute choice, for example, will be assigned burger if the user clicks on the Hamburger option. choice=burger is passed onto the CGI program. And if the user selects Fish, choice=fish will be assigned to the query string, and so on. These key/value pairs are used to build a query string to pass onto the CGI program after the Submit button is clicked. The input type this time is in the form of check boxes. More than one check box may be selected. The optional default box is already checked. When the user selects one of the check boxes, the value of the name attribute will be assigned one of the values from the value attribute, such as place=la if Los Angeles is checked. The <select> tag is used to produce a pop-up menu (also called a drop-down list) or a scrollable list. The name option is required. It is used to define the name for the set of options. For a pop-up menu, the size attribute is not necessary; it defaults to 1. The pop-up menu initially displays one option and expands to a menu when that option is clicked. Only one selection can be made from the menu. If a size attribute is given, that many items will be displayed. If the multiple attribute is given (e.g., select multiple name=whatever), the menu appears as a scrollable list, displaying all of the options. If the user clicks the Submit button, the CGI script listed in the form's action at-tribute will be launched. In this example, the script wasn't programmed to do anything. An error message is sent to the server's error log and to the browser. If the Clear button is clicked, all of the input boxes are reset to their defaults.
|
16.6.3. The GET Method
The simplest type of form is created with what is called the GET method. It is used every time the browser requests a document. If a method is not supplied, the GET method is the default. It is the only method used for retrieving static HTML files and images.
Since HTML is an object-oriented language, you may recall that a method is a name for an object-oriented subroutine. The GET method passes data to the CGI program by appending the input to the program's URL, usually as a URL-encoded string. The QUERY_STRING environment variable is assigned the value of the encoded string as was demonstrated in Example 16.12.
Servers often have size limitations on the length of the URL. For example, the UNIX size is limited to 1,240 bytes. If a lot of information is being passed to the server, the POST method should be used.

Example 16.12.
HTML Source File with a Form Tag and ACTION Attribute
---------------------------------------------------------------------
    <html>
      <head><title>First CGI Form</title></head>
    <body bgcolor=silver>
1     <form action="/cgi-bin/littleform.cgi" method=get>
          <!-- When user presses "submit", cgi script is called to
           process input -->
2          Please enter your name: <br>
3          <input type="text" size=50 name="Name">
           <p/>
       Please enter your phone number: <br>
4      <input type="text" size=30 name="Phone">
         <p/>
5      <input type=submit>
       <input type=reset value="Clear">
6    </form>
    </body>
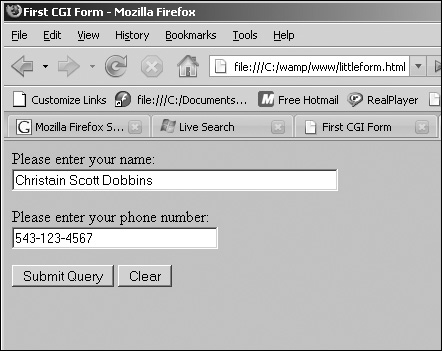
A form is created within the <body> tags of an HTML document. The <form> tag specifies the URL and method that will be used to process a form. When a user submits the form, the browser will send all the data it has obtained from the browser to the Web server. The action attribute tells the server to call a CGI script at the location designated in the URL and send the data on to that program to be processed. The method attribute tells the browser how the input data is to be sent to the server. The GET method is the default, so it does not need to be assigned here. The CGI program can do whatever it wants to with the data and, when finished, will send it back to the server. The server will then relay the information back to the browser for display. The user is asked for input. The input type is a text box that will hold up to 50 characters. The NAME attribute is assigned the string Name. This will be the key part of the key/value pair. The user will type something in the text box. The value entered by the user will be assigned to the name key. This name=value pair will be sent to the CGI script in that format; for example, Name=Christian. The name attribute for the input type is Phone. Whatever the user types in the text box will be sent to the CGI program as Phone=value; for example, Phone=543-123-4567. The submit attribute for the input type causes a Submit button to appear with the default string Send Query written on the button. If this box is selected, the CGI program will be executed. The input is sent to the CGI program. The reset attribute allows the user to clear all the input devices by clicking on the Clear button. The </form> tag ends the form.
|
The CGI Script
Example 16.13.
(The CGI Script)
1  #!c:/ActivePerl/bin/perl.exe
   # The CGI script that will process the form information sent
   # from the server

2  print "Content-type: text/html\n\n";

print "Processing CGI form :\n\n";
# Print out only the QUERY_STRING environment variable

while(($key, $value)=each(%ENV)){
  print "<h3>$key = <em>$value</em></h3><br>"
  if $key eq "QUERY_STRING";
}
The #! line tells the server where to find the Perl interpreter. It must be on the first and topmost line of the program and contain the exact path to the CGI script. One error in this line will result in "Internal Server Error." Always check this line first when debugging. Perl's output goes to the browser rather than the screen. The content type (also called the MIME header) is text/html, since there are HTML tags embedded in the text. Perl's input comes from the server. The while loop is used to loop through all of the environment variables in the %ENV hash. These variables were passed into the Perl script from the Web server. This line will be printed only when the value of the QUERY_STRING environment variable is found. It wasn't really necessary to loop through the entire list. It would have been sufficient to just type print "$ENV{QUERY_STRING}<BR>";.
|
16.6.4. Processing the Encoded Data
The Encoded Query String
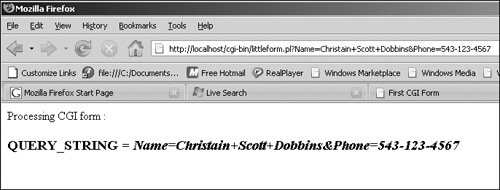
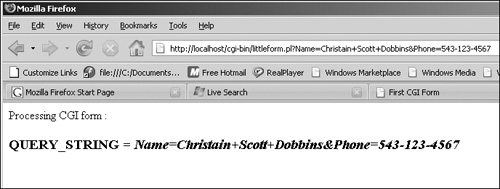
When using the GET method, information is sent to the CGI program in the environment variable QUERY_STRING. The string is URL-encoded. In fact, all data contained in an HTML form is sent from the browser to the server in an encoded format. When the GET method is used, this encoded data can be seen on the URL line in your browser, preceded by a question mark. The string following the ? will be sent to the CGI program in the QUERY_STRING environment variable. Each key/value pair is separated by an ampersand (&), and spaces are replaced with plus signs (+). Any nonalphanumeric values are replaced with their hexadecimal equivalent, preceded by a percent sign (%). After clicking the Submit button in the previous example, you would see the input strings in your browser's Location box (Netscape), appended to the URL line and preceded by a question mark. The highlighted part in the following example is the part that will be assigned to the environment variable, QUERY_STRING. The QUERY_STRING environment variable will be passed to your Perl script in the %ENV hash. To access the key/value pair in your Perl script, add a print statement: print $ENV{QUERY_STRING};.
Example 16.14.
1   What you see in the Location box of the browser:

http://servername/cgi-bin/
form1.cgi?Name=Christian+Dobbins&Phone=543-123-4567

2   What the server sends to the browser in the ENV hash value,
QUERY_STRING:

QUERY_STRING=Name=Christian+Dobbins&Phone=543-123-4567
|
Decoding the Query String with Perl
Decoding the query string is not a difficult task, because Perl has such a large number of string manipulation functions, such as tr, s, split, substr, pack, etc. Once you get the query string from the server into your Perl program, you can parse it and do whatever you want with the data. For removing &, +, and = signs from a query string, use the substitution command, s, the split function, or the translate function, tr. To deal with the hexadecimal-to-character conversion of those characters preceded by a % sign, the pack function is normally used.
Table 16.8. Encoding Symbols in a Query String
| Symbol | Function |
|---|
| & | Separates key/value pairs. |
| + | Replaces spaces. |
| %xy | Represents any ASCII character with a value of less than 21 hexadecimal (33 decimal) or greater than 7f (127 decimal) and special characters ?, &, %, +, and =. These characters must be escaped with a %, followed by the hexadecimal equivalence (xy) of that character, e.g., %2F represents a forward slash, and %2c represents a comma. |
Table 16.9. URL Hex-Encoded Characters
| Character | Value |
|---|
| Tab | %09 |
| Space | %20 |
| ! | %21 |
| " | %22 |
| # | %23 |
| $ | %24 |
| % | %25 |
| & | %26 |
| ( | %28 |
| ) | %29 |
| , | %2C |
| . | %2E |
| / | %2F |
| : | %3A |
| ; | %3B |
| < | %3C |
| = | %3D |
| > | %3E |
| ? | %3F |
| @ | %40 |
| [ | %5B |
| \ | %5C |
| ] | %5D |
| ^ | %5E |
| ' | %60 |
| { | %7B |
| | | %7C |
| } | %7D |
| ~ | %7E |
Parsing the Form's Input with Perl
After the Perl CGI script gets the input from the form, it will be decoded. This is done by splitting up the key/value pairs and replacing special characters with regular text. Once parsed, the information can be used to create a guest book, a database, send e-mail to the user, and so on.
The routines for parsing the encoded string can be stored in subroutines and saved in your personal library, or you can take advantage of the CGI.pm library module, part of Perl's standard distribution, which eliminates all the bother.
Decoding the Query String
Steps to decode are handled with Perl functions. The following shows a URL-encoded string assigned to $ENV{QUERY_STRING}.
Name=Christian+Dobbins&Phone=543-456-1234
The key/pair values show that the URL has three pieces of information separated by the ampersand (&): Name, Phone, and Sign:
Name=Christian+Dobbins&Phone=543-456-1234
The first thing to do would be to split up the line and create an array (see step 1). After splitting up the string by ampersands, remove the + with the tr or s functions, and split the remaining string into key/value pairs with the split function, using the = as the split delimiter (see step 2).
1. | @key_value = split(/&/, $ENV{QUERY_STRING});
print "@key_value\n"; |
2. | Output:
Name=Christian+Dobbins Phone=543-456-1234 |
The @key_value array created by splitting the query string:
| Name=Christian+Dobbins | Phone=543-456-1234 |
3. | foreach $pair ( @key_value){
$pair =~ tr/+/ /;
($key, $value) = split(/=/, $pair);
print "\t$key: $value\n";
} |
4. | Output:
Name: Christian Dobbins
Phone: 543-456-1234 |
Example 16.15.
(Another URL-Encoded String assigned to $ENV{QUERY_STRING})

1   $input="string=Joe+Smith%3A%2450%2c000%3A02%2F03%2F77";
2   $input=~s/%(..)/pack("c", hex($1))/ge;
3   print $input,"\n";

    Output:
    string=Joe+Smith:$50,000:02/03/77
This string contains ASCII characters that are less than 33 decimal and greater than 127, the colon, the dollar sign, the comma, and the forward slash. The pack function is used to convert hexadecimal-coded characters back into character format. The search side of the substitution, /%(..)/, is a regular expression that contains a literal percent sign followed by any two characters (each dot represents one character) enclosed in parentheses. The parentheses are used so that Perl can store the two characters it finds in the special scalar $1. On the replacement side of the substitution, the pack function will first use the hex function to convert the two hexadecimal characters stored in $1 to their corresponding decimal values and then pack the resulting decimal values into an unsigned character. The result of this execution is assigned to the scalar $input. Now you will have to remove the + sign.
|
16.6.5. Putting It All Together
The GET Method
Now it is time to put together a form that will be processed by a Perl CGI program using the GET method. The CGI program will decode the query string and display the final results on the HTML page that is returned after the form was filled out and the Submit button clicked.
The following examples demonstrate
The HTML source file that produced the form
The form after it has been processed by the CGI script
The Perl CGI script that processed the form
Example 16.16.
(The HTML source file)
<html><head><title>cgi form</title></head><body>
<hr/>
1 <form action="http://127.0.0.1/cgi-bin/getmethod.cgi" method=get>
<!When user presses "submit", cgi script is called to process input >
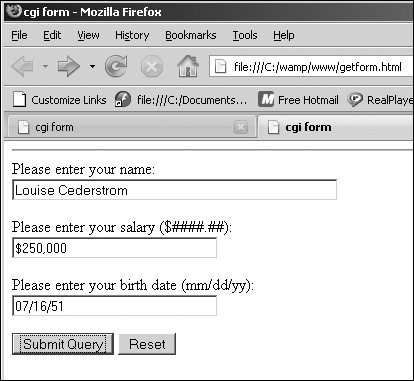
2 Please enter your name: <BR>
3 <input type="text" size=50 name=name>
<P/>
Plese enter your salary ($####.##): <BR>
<INPUT TYPE="text" SIZE=30 NAME=Salary>
<P/>
Plese enter your birth date (mm/dd/yy): <BR>
<input type="text" size=30 name=birthdate>
<P/>
4 <input type=submit value="Submit Query">
<INPUT TYPE=RESET VALUE="Reset">
5 </form>
</body></html>
The form is started with the <form> tag. When the user clicks the Submit button on the form, the action attribute triggers the HTTP server on this machine (local host is IP address 127.0.0.1) to start up the script called getmethod.cgi found under the server's root in the cgi-bin directory. The user is asked for information. The user will fill in the text boxes with his name, salary, etc. When the user clicks the Submit button, the CGI script assigned to the action at-tribute will be activated. This is the end of the form tag.
|
Example 16.17.
|
Code View: #!c:/perl/bin/perl
# The CGI script that processes the form shown in Example 8.12.
1 print "Content-type: text/html\n\n";
2 print <<HTML;
<html><title>Decoding the Input Data</title>
<body bgcolor="lavender">
<font face="verdana" size="+1">
HTML
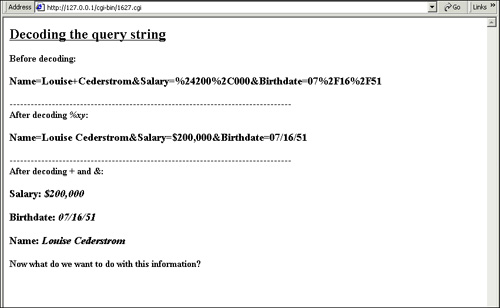
print "<H3><U>Decoding the query string</U></H3>";
# Getting the input
3 $inputstring=$ENV{QUERY_STRING}};
print "<B>Before decoding:</B>";
print "<P>$inputstring";
# Extracting the + and & and creating key/value pairs
4 @key_value=split(/&/,$inputstring);
foreach $pair ( @key_value){
5 ($key, $value) = split(/=/, $pair);
6 $value=~s/%(..)/pack("C", hex($1))/ge;
$value =~ s/\n/ /g;
$value =~ s/\r//g;
$value =~ s/\cM//g;
7 $input{$key}=$value ; # Creating a hash
}
# After decoding
print "<HR>";
print "<P><B>After decoding:</B><P>";
8 while(($key, $value)=each(%input)){
print "$key: <I>$value</I><BR>";
}
print <<HTML;
<hr>
<p>Now what do we want to do with this information? </p>
</font>
</body>
</html>
HTML
This MIME header line describes the format of the data returned from this program to be HTML text. The two newlines (required!) end the header information. The %ENV hash contains the key/value pairs sent to this Perl program by the Web server. The value of the QUERY_STRING environment variable is assigned to a scalar, $inputstring. The tr function translates all + signs to spaces. The pack function converts any hexadecimal numbers to their corresponding ASCII characters. The value of the scalar $inputstring is sent from the Perl script to the server and then on to the browser. The scalar $inputstring is now split by ampersands. The output returned is stored in the three-element array @key_value as: Name=Louise Cederstrom&Salary=$200,000&Birthdate=7/16/51 The foreach loop is used to iterate through the @key_value array. The resulting key/value pairs are created by splitting each array element by the = sign. A new hash called %input is created with corresponding key/value pairs. The while loop is used to iterate through the hash. The new key/value pair is printed and sent back to the Web server. The browser displays the output. Now that the Perl script has parsed and stored the input that came from the form, it is up to the programmer to decide what to do with this data. He may send back an e-mail to the user, store the information in a database, create an address book, etc. The real work is done!
|
16.6.6. The POST Method
The only real difference between the GET and POST methods is the way input is passed from the server to the CGI program. When the GET method is used, the server sends input to the CGI program in the QUERY_STRING environment variable.
When the POST method is used, the CGI program gets input from standard input, STDIN. Either way, the input is encoded in exactly the same way. One reason for using the POST method is that some browsers restrict the amount of data that can be stored in the QUERY_STRING environment variable. The POST method doesn't store its data in the query string. Also, the GET method displays the input data in the URL line in the Location box of the browser, whereas the POST method hides the data. Since the POST method does not append input to the URL, it is often used in processing forms where there is a lot of data being filled into forms.
In an HTML document, the <FORM> tag starts the form. The ACTION attribute tells the browser where to send the data that is collected from the user, and the METHOD attribute tells the browser how to send it. If the POST is method used, the output from the browser is sent to the server and then to the CGI program's standard input, STDIN. The amount of data, that is, the number of bytes taken as input from the user, is stored in the CONTENT_LENGTH environment variable.
Rather than assigning the input to the QUERY_STRING environment variable, the browser sends the input to the server in a message body, similar to the way e-mail messages are sent. The server then encapsulates all the data and sends it on to the CGI program.
The CGI program reads input data from the STDIN stream via a pipe.
The Perl read function reads the CONTENT_LENGTH amount of bytes, saves the input data in a scalar, and then processes it the same way it processes input coming from the query string. It's not that the format for the input has changed; it's just how it got into the program. Note that after the POST method has been used, the browser's Location box does not contain the input in the URL as it did with the GET method.
Example 16.18.
(The HTML source file)
<HTML>
<HEAD>
<TITLE>CGI Form</TITLE>
<HR>
1 <FORM ACTION="http://127.0.0.1/cgi-bin/postmethod.cgi" METHOD=POST>
<!When user presses "submit", cgi script is called to process input >
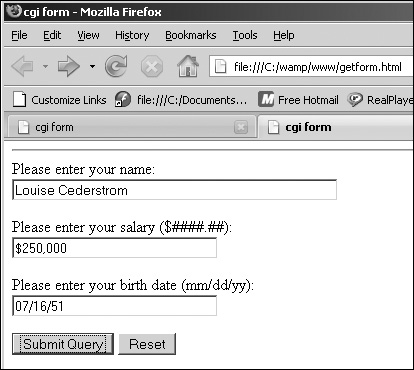
2 Please enter your name: <BR>
3 <INPUT TYPE="text" SIZE=50 NAME=Name>
<P>
Please enter your salary ($####.##): <BR>
<INPUT TYPE="text" SIZE=30 NAME=Salary>
<P>
Please enter your birth date (mm/dd/yy): <BR>
<INPUT TYPE="text" SIZE=30 NAME=Birthdate>
<P>
4 <INPUT TYPE=SUBMIT VALUE="Submit Query">
<INPUT TYPE=RESET VALUE="Reset">
5 </FORM>
</HTML>
The <FORM> tag starts the form. The ACTION attribute is assigned the URL of the CGI script, postmethod.cgi, that will be executed whent the Submit button is clicked by the user, and the METHOD attribute is assigned POST to indicate how the data coming from the form will be handled. The user is asked for input. Text fields are created to hold the user's name, salary, and birth date. The Submit button is created.
|
Example 16.19.
|
Code View: #!c:/perl/bin/perl
# The CGI script that processes the form shown in Example 8.12.
1 print "Content-type: text/html\n\n";
2 print <<HTML;
<html><title>Decoding the Input Data</title>
<body bgcolor="lavender">
<font face="verdana" size="+1">
HTML
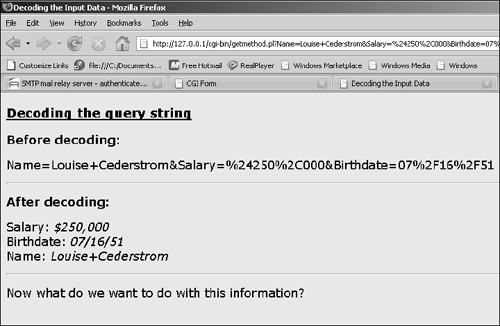
print "<H3><U>Decoding the query string</U></H3>";
# Getting the input
3 $inputstring=$ENV{QUERY_STRING}};
print "<B>Before decoding:</B>";
print "<P>$inputstring";
# Extracting the + and & and creating key/value pairs
4 @key_value=split(/&/,$inputstring);
foreach $pair ( @key_value){
5 ($key, $value) = split(/=/, $pair);
6 $value=~s/%(..)/pack("C", hex($1))/ge;
$value =~ s/\n/ /g;
$value =~ s/\r//g;
$value =~ s/\cM//g;
7 $input{$key}=$value ; # Creating a hash
}
# After decoding
print "<HR>";
print "<P><B>After decoding:</B><P>";
8 while(($key, $value)=each(%input)){
print "$key: <I>$value</I><BR>";
}
print <<HTML;
<hr>
<p>Now what do we want to do with this information? </p>
</font>
</body>
</html>
HTML
This MIME header line describes the format of the data returned from this program to be HTML text. The two newlines (required!) end the header information. The here document is used to set up the beginning of the HTML page. The %ENV hash contains the key/value pairs sent to this Perl program by the Web server. The value of the QUERY_STRING environment variable is assigned to a scalar, $inputstring. The scalar $inputstring is now split by ampersands. The output returned is stored in the three-element array @key_value as: Name=Louise+Cederstrom Salary=$200,000 Birthdate=7/16/51
$key_value[0] $key_value[1] $key_value[2] The foreach loop takes each element of the array, one at a time. Each element is first split up by "=" signs, creating two values, one called $key to represent the name of the input device from the HTML form; e.g., "Name"; and the second, $value, containing the data that was typed by the user into the input device; e.g., "Louise+Cederstrom". Now the hexidecimal values are decoded with the Perl pack function into their respective ASCII values. A new hash called %input is created using the decoded key/value pairs. The while loop is used to iterate through the hash. The new key/value pair is printed and sent back to the Web server. The browser displays the output. Now that the perl script has parsed and stored the input that came from the form, it is up to the programmer to decide what to do with this data. He may send back an e-mail to the user, store the information in a database, create an address book, etc. The real work is done!
|
16.6.7. Handling E-mail
The SMTP Server
When processing a form, it is often necessary to send e-mail before exiting. You may be sending e-mail to the user and/or to yourself with the submitted form data. E-mail cannot be sent over the Internet without a valid SMTP (Simple Mail Transfer Protocol) server.
The SMTP server is an instance of a mail daemon program that listens for incoming mail on Port 25. SMTP is a TCP-based client/server protocol where the client sends messages to the server. UNIX systems commonly use a mail program called sendmail to act as the SMTP server listening for incoming mail. Normally, you would run sendmail at the command line with the recipient's name as an argument. To end the e-mail message, a period is placed on a line by itself. In a CGI script, the mail will not be sent interactively, so you will probably want to use the sendmail options to control these features. See Table 16.10.
Table 16.10. sendmail Options
| Option | What It Does |
|---|
| -o | A sendmail option follows |
| -t | Reads headers To, From, Cc, and Bcc information from message body |
| -f "email address" | Message is from this e-mail address |
| -F "name" | Message is from name |
| -i | Periods will be ignored if on a line by themselves |
| -odq | Queues up multiple e-mail messages to be delivered asynchronously |
For Windows, two programs similar to sendmail are Blat, a public domain Win32 console utility that sends e-mail using the SMTP protocol (see www.interlog.com/~tcharron/blat.html), and wSendmail, a small utility that can send e-mail from programs, the command line, or directly from an HTML form (see http://www.scriptarchive.com/, /Internet/E_Mail/E_Mail_Tools or http://www.developertutorials.com/tutorials/cgiperl/email-with-perl-2/page4.html). Go to CPAN and find the MailFolder package, which contains such modules as Mail::Folder, Mail::Internet, and Net::SMTP to further simplify sending and receiving e-mail.
Example 16.20.
|
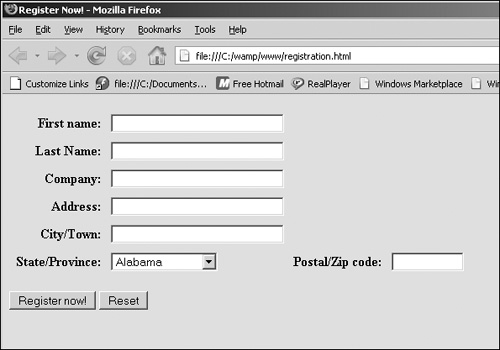
Code View: (From the HTML form where the e-mail information is collected)
<html>
<head><title>Register Now!</title></head>
<body bgcolor="ccff66">
<form method="post" action="http://127.0.0.1/cgi-bin/mailer.pl">
<input type="hidden" name="xemailx"
value="elizabeth@ellieq.com">
<input type="hidden" name="xsubjext"
value="course registration">
<input type="hidden" name="xgoodbyex"
value="thank you for registering.">
<p>
<a name="registration">
<table cellspacing=5 cellpadding=3>
<tr> <td align=right><b>First name:</b></td>
<td align=left><input type=text size=30 name="first_name*"
value=""></td>
</tr>
</p>
<tr> <td align=right><B>Last Name:</B></TD>
<td align=left><input type=text size=30 name="last_name*"
value=""></td>
</tr>
<tr>
<td align=right><b>Company:</b></td>
<td align=left><input type=text size=30 name="company*"></td>
</tr>
<tr>
<td align=right><b>Address:</b></td>
<td align=left><input type=text size=30 name="address1*"
value=""></td>
</tr>
<tr>
<td align=right><b>City/Town:</b></td>
<td align=left><input type=text size=30 name="city*"
value=""></td>
</tr>
<tr>
<td align=right><b>State/Province:</b></td>
<td align=left>
<select name="state" size="1">
<option value="AL">Alabama</option>
<option value="AK">Alaska</option>
<option value="AZ">Arizona</option>
<option value="AR">Arkansas</option>
<option value="CA">California</option>
<option value="CO">Colorado</option>
<option value="CT">Connecticut</option>
--- continue here ---
<option value="WA">Washington</option>
<option value="WV">West Virginia</option>
<option value="WI">Wisconsin</option>
<option value="WY">Wyoming</option>
</select>
<td align=right><b>Postal/Zip code:</b></td>
<td align=left><input type=text size=10 name="zip"
value=""></td>
</tr></b></td>
</table>
<p>
<input type=submit value="Register now!"></td>
<input type=reset></td>
</tr>
</form>
</body>
</html>
|
Example 16.21.
|
Code View: (CGI script to Handle email--only a portion of the script)
# An HTML Form was first created and processed to get the name of the
# user who will receive the e-mail, the person it's from, and the
# subject line.
1 $mailprogram="/usr/lib/sendmail"; # Your mail program goes here
2 $sendto="$input{xemailx}"; # Mailing address goes here
3 $from="$input{xmailx}";
4 $subject="$input{xsubjext}";
5 open(MAIL, "|$mailprogram -t -oi") || die "Can't open mail
program: $!\n";
# -t option takes the headers from the lines following the mail
# command -oi options prevent a period at the beginning of a
# line from meaning end of input
6 print MAIL "To: $sendto\n";
print MAIL "From: $from\n";
print MAIL "Subject: $subject\n\n";
7 print MAIL <<EOF; # Start a "here document"
Registration Information for $input{$first_name}
$input{$last_name}:
Date of Registration: $today
-----------------------------------------------
First Name: $input{$first_name}
Last Name: $input{$last_name}
Street Address: $input{$address}
City: $input{$city}
State/Province: $input{$state}
<Rest of message goes here>
8 EOF
9 close MAIL; # Close the filter
The name of the mail program being used here is sendmail, located in the UNIX subdirectory /usr/lib. This line will be assigned to the To: header in the e-mail document. This line will be assigned to the From: header in the e-mail document. And this line is the Subject: header in the e-mail document. Perl is going to open a filter called MAIL that will pipe the user's e-mail message to the sendmail program. The -t option tells sendmail to scan the e-mail document for the To:, From:, and Subject: lines (instead of from the command line), and the -i option tells the mail program to ignore any period that may be found on a line by itself. These are the header lines indicating to whom the mail is going, where it's going, and the subject of the mail. These values were pulled from the form. A here document is started. The text between EOF and EOF is sent to the sendmail program via the MAIL filter. EOF marks the end of the here document. The MAIL filter is closed.
|