16.7. The CGI.pm Module
16.7.1. Introduction
The most popular Perl 5 library for writing dynamic CGI programs, such as guest-books, page counters, feedback forms, etc., is the CGI.pm module written by Lincoln Stein; it is included in the standard Perl library starting with version 5.004. The most recent version of CGI.pm can be found at www.perl.com/CPAN. CGI.pm takes advantage of the object-oriented features that were introduced in Perl 5 and also provides methods (GET and POST) to interpret query strings, handle forms, and hide the details of HTML syntax.
Lincoln Stein has also written the Official Guide to Programming with CGI.pm (www.wiley.com/compbooks/stein), an excellent, easy-to-read guide from which much of the following information was gleaned.
16.7.2. Advantages
CGI.pm allows you to keep a fill-out form (HTML) and the script that parses it, all in one file under the cgi-bin directory. In this way, your HTML file (that holds the form) and your CGI script (that reads, parses, and handles the form data) are not so far apart.
After the user has filled out a form, the results appear on the same page; in other words, the user doesn't have to backpage to see what was on the form, and the fill-out form does not lose data it maintains its state. Data that doesn't disappear is called "sticky." To override stickiness, see "The override Argument" on page 593.
All the reading and parsing of form data is handled by the module.
Methods are used to replace HTML tags for creating text boxes, radio buttons, menus, etc., to create the form, as well as for assigning standard tags, such as headers, titles, paragraph breaks, horizontal rule lines, breaks, etc.
To see what HTML tags are produced by the CGI.pm module, from the View menu, select Source (in Internet Explorer) after the form has been displayed.
Accepting uploaded files and managing cookies is easier with the CGI.pm module.
16.7.3. Two Styles of Programming with CGI.pm
The Object-Oriented Style
Using the object-oriented style, you create one or more CGI objects and then use object methods to create the various elements of the page. Each CGI object starts out with the list of named parameters that were passed to your CGI script by the server. You can modify the objects and send them to a file or database. Each object is independent; it has its own parameter list. If a form has been filled out, its contents can be saved from one run of the script to the next; that is, it maintains its state. (Normally, the HTML documents are stateless; in other words, everything is lost when the page exits.)
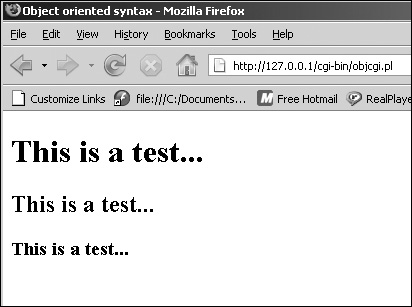
Example 16.22.
1   use CGI;
2   $obj=new CGI;  # Create the CGI object
3   print $obj->header,     # Use functions to create the HTML page
4   $obj->start_html("Object oriented syntax"),
5   $obj->h1("This is a test..."),
    $obj->h2("This is a test..."),
    $obj->h3("This is a test..."),
6   $obj->end_html;
The following output can be seen by viewing the source from the browser. It demonstrates the HTML output produced by the CGI.pm module.
<!DOCTYPE html
PUBLIC "-//W3C//DTD XHTML 1.0 Transitional//EN"
"DTD/xhtml1-transitional.dtd">
<html xmlns="http://www.w3.org/1999/xhtml" lang="en-US">
<head><title>Object oriented syntax</title></head><body>
<h1>This is a test...</h1>
<h2>This is a test...</h2>
<h3>This is a test...</h3>
</body
</html>
|
Function-Oriented Style
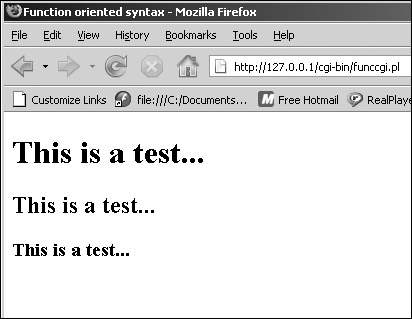
The function-oriented style is easier to use than the object-oriented style, because you don't create or manipulate the CGI object directly. The module creates a default CGI object for you. You use the same built-in functions to manipulate the object, pass parameters to the functions to create the HTML tags, and retrieve the information passed into the form.
Although the function-oriented style provides a cleaner programming interface, it limits you to using one CGI object at a time.
The following example uses the function-oriented interface. The main differences are that the :standard functions must be imported into the program's namespace, and you don't create a CGI object. It is created for you.
Example 16.23.
    #!/usr/bin/perl
1   use CGI qw(:standard);   # Function-oriented style uses a set of
                             # standard functions
2   print header,
3     start_html("Function oriented syntax"),
4     h1("This is a test..."),
      h2("This is a test..."),
      h3("This is a test..."),
5   end_html;
|
16.7.4. An Important Warning!
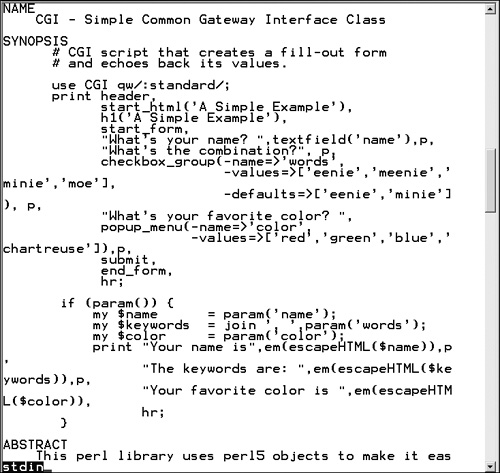
Perl's print function is used to send output from your script to the server, but in many of the examples, rather than using separate print statements on each line, the print function is passed multiple strings separated by commas. In fact, in the CGI.pm documentation, the sample script shown in Figure 16.23 starts with one print function to be continued over 30 lines and finally terminated with a semicolon. It is very easy to prematurely terminate one of the lines with a semicolon. Doing so will break your program and send an "Internal Server Error" message to the browser.
Another common error is improperly terminating a here document. To avoid using multiple print lines, the here document (see Chapter 4) is often used. The terminating word for a here document MUST be on a line by itself and flush against the left margin, with no space surrounding it, and terminated with a carriage return.
    #!/bin/perl
    # The HTML tags are embedded in the here document to avoid using
    # multiple print statements
1   print <<EOF;     # here document in a CGI script
2   Content-type: text/html
3
4   <HTML><HEAD><TITLE>Town Crier</TITLE></HEAD>
    <H1><CENTER>Hear ye, hear ye, Sir Richard cometh!!</CENTER></H1>
    </HTML>
5   EOF
    # The EOF in line 5 cannot have surrounding spaces and must be
    # terminated with a newline.
16.7.5. HTML Form Methods
A CGI script consists of two parts: the part that creates the form that will be displayed in the browser and the part that retrieves the input from the form, parses it, and handles the information by sending it back to the browser, to a database, to e-mail, etc.
Creating the HTML Form
Methods are provided to simplify the task of creating the HTML form. For example, there are methods to start and end the HTML form and methods for creating headers, check boxes, pop-up menus, radio buttons, Submit and Reset buttons, etc. Table 16.11 lists the most-used of the HTML methods provided by CGI.pm.
Table 16.11. HTML Methods
| Method | What It Does | Attributes |
|---|
| a() | Anchor tag <A> | -href, -name, -onClick, -onMouseOver, -target |
| | Example: print a({-href://google.com/'}, "Go Search"}; | |
| b() | Bold text <B>
Example: print b("This text is bold"); | |
| basefont() (:html3) | Set size of base font <FONT>
Example: print basefont({-size=7}); | -size (sizes 1–7) |
| big (:netscape group) | Increase text font size <BIG>
Example: print "Large, big("and larger"); | |
| br() | Creates a line break <BR>
Example: print "Break line here", br, "New line starts here."; | |
| caption (:html3) | Inserts a caption above a table <CAPTION> | -align, -valign |
| | print table(caption(b(Table Caption)), Tr( continue table here...) | |
| center() (:netscape group) | Center text <CENTER> | Doesn't seem to work Use the <CENTER> tag. |
| cite() | Creates text in a proportional italic font <CITE> | |
| checkbox() | Creates a single named check box and label | -checked, -selected, -on, -label, -name, -onClick, -override, -force, -value |
| checkbox_group() | Creates a set of check boxes linked by one name | -columns, -cols, -colheaders, -default, -defaults, -labels, -linebreak, -name, -nolabels, -onClick, -override, -force, -rows, -rowheaders, -value, -values |
| code() | Creates text in a monospace font <CODE> | |
| dd() | Definition item of definition list <DD> | |
| defaults() | Creates a fill-out button for submitting a form as though for the first time; clears the old parameter list | |
| dl() | Creates a definition list <DL>; see dd() | -compact |
| dt() | Term part of definition list <DT> | |
| em() | Emphatic (italic) text | |
| end_form(), endform() | Terminate a form </FORM> | |
| end_html() | Ends an HTML document </BODY></HTML> | |
| font() (:netscape group) | Changes font | -color, -face, -size |
| frame() (:netscape group) | Defines a frame | -marginheight, -marginwidth, -name, -noresize, -scrolling, -src |
| frameset() (:netscape group) | Creates a frameset <FRAMESET> | -cols, -rows |
| h1()...h6() | Creates heading levels 1–6 <H1>, <H2> ... <H6> | |
| hidden() | Creates a hidden, invisible text field, uneditable by the user | |
| hr() | Creates a horizontal rule <HR> | -align, -noshade, -size, -width |
| i() | Creates italic text <I> | |
| img() | Creates an inline image <IMG> | -align, -alt, -border, -height, -width, -hspace, -ismap, -src, -lowsrc, -vrspace, -usemap |
| image_button() | Produces an inline image that doubles as a form submission button | -align, -alt.-height, -name, -src, -width |
| kbd() | Creates text with keyboard style | |
| li() | Creates list item for an ordered or unordered list | -type, -value |
| ol() | Start an ordered list | -compact, -start, -type |
| p() | Creates a paragraph <P> | -align, -class |
| password_field() | Creates a password field; text entered will be stars | |
| popup_menu() | Creates a pop-up menu <SELECT><OPTION> | -default, -labels, -name, -onBlur, -onChange, -onFocus, -override, -force, -value, -values |
| pre() | Creates preformatted typewriter text for maintaining line breaks, etc. <PRE> | |
| radio_group() | Creates a set of radio buttons all linked by one name | -columns, -cols, -colheaders, -default, -labels, -linebreak, -name, -nolabels, -onClick, -override, -force, -rows, -rowheaders, -value, -values |
| reset() | Creates form's Reset button | |
| scrolling_list() | Controls a scrolling list box form element | -default, -defaults, -labels, -multiple, -name, -onBlur, -onChange, -onFocus, -override, -force, -size, -value, -values |
| Select() | Creates a select tag; note the uppercase "S" to avoid conflict with Perl's built-in select function. <SELECT> | |
| small() (:netscape group) | Reduce size of text | |
| start_form(),startform() | Starts an HTML form <FORM> | |
| start_multipart_form(), | Just like start_form but used when uploading files | |
| strong() | Bold text | |
| submit() | Creates a Submit button for a form | -name, -onClick, -value, -label |
| sup() (:netscape group) | Superscripted text | |
| table() (:html3 group) | Creates a table | -align,bgcolor, -border, -bordercolor, -bordercolor-dark, -bordercolorlight, -cellpadding, -hspace, -vspace, -width |
| td() (:html3 group) | Creates a table data cell <TD> | -align, -bgcolor, -bordercolor, -bordercolorlight,-bordercolordark, -colspan, -nowrap, -rowspan, -valign, -width |
| textarea() | Creates a multiline text box | -cols, -columns, -name, -onChange, -onFocus,0nBlur, -onSelect, -override, -force, -value, -default, -wrap |
| textfield() | Produces a one-line text entry field | -maxLength, -name, -onChange, -onFocus, -onBlur, -onSelect, -override, -force, -size, -value, -default |
| th() (:html3 group) | Creates a table header <TH> | |
| Tr() (:html3 group) | Defines a table row; note the uppercase "T" to avoid conflict with Perl's tr function. <TR> | -align,bgcolor, -bordercolor, -bordercolordark, -bordercolorlight, -valign |
| tt() | Typewriter font | |
| ul() | Start unordered list | |
When passing arguments to the CGI.pm methods, two styles can be used:
Named arguments—passed as key/value pairs. Argument names are preceded by a leading dash and are case insensitive.
Example 16.24.
(Named Arguments)
1   print popup_menu(-name=>'place',
                     -values=>['Hawaii','Europe','Mexico', 'Japan' ],
                     -default=>'Hawaii',
                    );
2   print popup_menu(-name=>'place',
                     -values=> \@countries,
                     -default=>'Hawaii',
                    );
The arguments being passed to the popup_menu method are called named parameters, or argument lists. The argument names in this example are -name, -values, and -default. These arguments are always preceded by a leading dash and are case insensitive. If the argument name might conflict with some built-in Perl function or reserved word, quote the argument. Note that the arguments are passed to the method as a set of key/value pairs. The -values key has a corresponding value consisting of an anonymous array of countries. This is exactly like the previous example, except that the value for the -values key is a reference to an array of countries. Somewhere else in the program, the array @countries was created and given values.
|
Positional arguments—passed as strings, they represent a value. They are used with simple HTML tags. For example, CGI.pm provides the h1() method to produce the HTML tags <H1> and </H1>. The argument for h1() is the string of text that is normally inserted between the tags. The method is called as follows:
print h1("This is a positional argument");which translates to
<H1>This is a positional argument</H1>
If using HTML attributes, and the first argument is a reference to an anonymous hash, the attribute and its values are added after the leading tag into the list. For example:
print h1({-align=>CENTER}, "This heading is centered");translates to
<H1 ALIGN="CENTER">This heading is centered</H1>
If the arguments are a reference to an anonymous list, each item in the list will be properly distributed within the tag. For example:
print li( ['apples', 'pears', 'peaches'] );
translates to three bulleted list items:
<LI>apples</LI> <LI>pears</LI> <LI>peaches</LI>
whereas
print li( 'apples', 'pears', 'peaches' );
translates to one bulleted list item:
<LI>apples pears peaches</LI>
Example 16.25.
(The CGI script)
 #!c:/ActivePerl/bin/perl.exe
 # Shortcut calling styles with HTML methods

1  use CGI qw(:standard);  # Function-oriented style print header
2  print header;
# Note that the following functions are all embedded as a
# comma-separated list of arguments in one print statement.

3  print start_html(-title=>"Testing arguments",
                  -bgcolor=>"#99FF66"),
4     b(),font({-size=>"+2", -color=>"#006600"}),
5     p(),"\n",
6     p("This is a string"),"\n",
7     p({-align=>center}, "red", "green", "yellow"), "\n",
8      p({-align=>left}, ["red","green","yellow"]),
9      end_html;# Shortcut calling styles with HTML methods
The function-oriented style of the CGI.pm module is used. The header function generates the header information ("Content-type: text/html\n\n"). The start_html function starts the HTML document, including the title of the page and the background color (a lime green). The b function generates a <b> tag to create bold, and the font function causes the font to be increased by two sizes and to be a dark green color. The p function generates a paragraph tag that takes no arguments. It is a start tag only. This p function takes a string as its argument, causing the string to be printed as a separate paragraph. The first argument to the p function causes the paragraph to be centered on the page. The paragraph's text is displayed as one line in the browser: red green yellow. This paragraph tag displays each word, left-justified, on a line by itself. It consists of a start tag, with the attributes for left alignment distributed across each of the listed arguments. The arguments are listed as a reference to an anonymous array. This creates the ending </body> and </html> tags.
|
Example 16.26.
 <!DOCTYPE html
    PUBLIC "-//W3C//DTD XHTML 1.0 Transitional//EN"
     "http://www.w3.org/TR/xhtml1/DTD/xhtml1-transitional.dtd">
  <html xmlns="http://www.w3.org/1999/xhtml" lang="en-US"
xml:lang="en-US">
  <head>
     <title>Testing arguments</title>
     <meta http-equiv="Content-Type" content="text/html;charset=iso-
   8859-1" />
  </head>
  <body bgcolor="#99FF66">
  <b /><font color="#006600" size="+2" /><p />
  <p>This is a string</p>
  <p align="center">red green yellow</p>
  <p align="left">red</p> <p align="left">green</p> <p
align="left">yellow</p>
  </body>
  </html>
|

To avoid conflicts and warnings (-w switch), enclose all arguments in quotes.
16.7.6. How CGI.pm Works with Forms
The CGI.pm module makes it possible to create the form and process it all in one Perl script. (You can create a separate HTML form and do just the processing part with CGI.pm, but these examples demonstrate combining the whole process in one Perl script.) The module provides methods or functions to handle every aspect of creating a Web page from starting the HTML document to creating a form and its input devices to parsing and decoding the input data. These scripts, where you are producing a form and processing its input on the same page, are self-processing forms, meaning that in the ACTION attribute, the address of the same script that printed the form is activated when the user clicks the Submit button. The script simply needs to perform some test to make sure the form was submitted. You will see how all this is done now.
The start_html Method
After creating the HTTP header, most CGI scripts will start an HTML document. The start_html() method creates the top of the page and options to tailor the appearance and behavior of the page, such as the background color, title, DTD, author, etc. It creates the header line ("Content-type") and also starts the opening <body> tag for the document.
The start_form Method
The form is created with start_form method and its arguments. Each of the field types also a CGI method provided by the module, such as textfield, popup_menu, submit, etc., listed in Table 16.11. Each of these methods is described in detail later in this chapter.
The submit Method
Of course, in order to process the form, it must be submitted. The submit method provides the form's Submit button.
The param Method
This is a very important part of CGI.pm After the user has filled in a form, the CGI.pm module will take the input from the form, decode it, and store it in name/value pairs. This is all invisible to the user. The names and values can be retrieved with the param() function. When param() is called, if null is returned, then the form has not yet been filled out. If the param() function returns true (non-null), then the form must have been filled out, and the param() function can be used to retrieve the form information. If you want an individual value, the param() can retrieve it by its name; i.e., the name of the input device in the form.
The following example illustrates the two parts to the CGI program: the HTML form and how to get the information with the param() function. For a list of other methods used to process parameters, see Table 16.13.
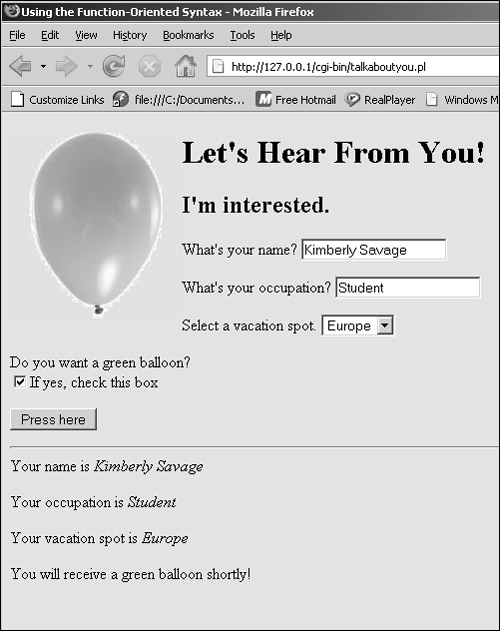
Example 16.27.
|
Code View: #!c:/ActivePerl/bin/perl.exe
1 use CGI qw(:standard);
2 print header;
3 print start_html(-title=>'Using the Function-Oriented Syntax',
-BGCOLOR=>'yellow');
4 print img({-src=>'/greenballoon.jpg', -align=>LEFT}),
h1("Let's Hear From You!"),
h2("I'm interested."),
5 start_form,
6 "What's your name? ", textfield('name'),
p,
"What's your occupation? ", textfield('job'),
p,
7 "Select a vacation spot. ", popup_menu(
-name=>'place',
-values=>['Hawaii','Europe','Mexico', 'Japan' ],
),
p,
8 "Do you want a green balloon? ", br,
checkbox(-name=>'choice',-label=>'If yes, check this box'),
p,
9 submit("Press here"),
10 end_form;
print hr;
11 if ( param() ){ # If the form has been filled out,
# there are parameters
12 print "Your name is ", em(param('name')),
p,
"Your occupation is ", em(param('job')),
p,
"Your vacation spot is ", em(param('place')),
p;
13 if( param('choice') eq "on"){
print "You will receive a green balloon shortly!"
}
else{
print "Green may not be the best color for you.";
}
hr;
}
The use directive says that the CGI.pm module is being loaded and will import the :standard set of function calls, which use a syntax new in library versions 1.21 and higher. This syntax allows you to call methods without explicitly creating an object with the new constructor method; that is, the object is created for you. The Official Guide to Programming with CGI.pm by Lincoln Stein contains a complete list of shortcuts. The header method header returns the Content-type: header. You can provide your own MIME type if you choose; otherwise, it defaults to text/html. This will return a canned HTML header and the opening <BODY> tag. Parameters are optional and are in the form -title, -author, and -base. Any additional parameters, such as the Netscape unofficial BGCOLOR attribute, are added to the <BODY> tag; for example, BGCOLOR=>yellow. The img method allows you to load an image. This GIF image is stored under the document's root in a directory called Images. It is aligned to the left of the text. Note: The print function here does not terminate until line 11. All of the CGI functions are passed as a comma-separated list to the print function. This will produce a level 1 heading tag. It's a shortcut and will produce the <H1> HTML tag. This method starts a form. The defaults for the form are the ACTION attribute, assigned the URL of this script, and the METHOD attribute, assigned the POST method. The textfield method creates a text field box. The first parameter is the NAME for the field the second parameter; representing the VALUE, is optional. NAME is assigned name and VALUE is assigned "". The p is a shortcut for a paragraph <P>. The popup_menu method creates a menu. The required first argument is the menu's name (-name). The second argument, -values, is an array of menu items. It can be either anonymous or named. The submit method creates the Submit button. If the param method returns non-null, each of the values associated with the parameters will be printed. The param method returns the value associated with name; in other words, what the user typed as input for that parameter.
|

Checking the Form at the Command Line
If you want to see the HTML tags generated by the CGI.pm form, you can run your script at the command line, but you will probably see the following error message:
(Offline mode: enter name=value pairs on standard input)
You can handle this by typing in key/value pairs and then pressing <Ctrl>-d (UNIX) or <Ctrl>-z (Windows) or by passing an empty parameter list. When the parameter list is empty, the output will let you see the HTML tags that were produced without any values assigned. See Example 16.28.
Example 16.28.
|
Code View: (At the Command Line)
1 $ perl talkaboutyou.pl
(Offline mode: enter name=value pairs on standard input)
name=Dan
job=Father
place=Hawaii
<Now press Ctrl-d or Ctrl-z>
(Output)
Content-Type: text/html
<!DOCTYPE HTML PUBLIC "-//IETF//DTD HTML//EN">
<HTML><HEAD><TITLE>Using the Function Oriented Syntax</TITLE>
</HEAD><BODY BGCOLOR="yellow">
<H1>Let's Hear From You!</H1>
<H2>I'm internested.</H2>
<FORM METHOD="POST" ENCTYPE="application/x-www-form-urlencoded">
What's your name? <INPUT TYPE="text" NAME="name"
VALUE="Dan"><P>What's your occupation? <INPUT TYPE="text"
NAME="job" VALUE="Father"><P>Select a vacation spot.
<SELECT NAME="place">
<OPTION SELECTED VALUE="Hawaii">Hawaii
<OPTION VALUE="Europe">Europe
<OPTION VALUE="Mexico">Mexico
<OPTION VALUE="Japan">Japan
</SELECT>
<P><INPUT TYPE="submit" NAME=".submit"></FORM>
<HR>Your name is <EM>Dan</EM><P>Your occupation is <EM>Father
</EM><P>Your vacation spot is <EM>Hawaii</EM><HR>
(At the Command Line)
2 $ perl talkaboutyou.pl < /dev/null or perl talkaboutyou.pl ' '
Content-Type: text/html
(Output)
<!DOCTYPE HTML PUBLIC "-//IETF//DTD HTML//EN">
<HTML><HEAD><TITLE>Using the Function Oriented Syntax</TITLE>
</HEAD><BODY BGCOLOR="yellow">
<H1>Let's Hear From You!</H1>
<H2>I'm interested.</H2><FORM METHOD="POST"
ENCTYPE="application/x-wwwform-urlencoded">
What's your name? <INPUT TYPE="text" NAME="name"
VALUE=""><P>What's your occupation? <INPUT TYPE="text"
NAME="job" VALUE=""><P>Select a vacation spot.
<SELECT NAME="place">
<OPTION VALUE="Hawaii">Hawaii
<OPTION VALUE="Europe">Europe
<OPTION VALUE="Mexico">Mexico
<OPTION VALUE="Japan">Japan
</SELECT>
<P><INPUT TYPE="submit" NAME=".submit"></FORM><HR>Your name is
<EM><P>Your occupation is <EM><P>Your vacation spot is <EM><HR>
When running in offline mode, you can enter the key/value pairs as standard input. You need to check the form so that you get the right keys and then supply the values yourself. In this example, name=Dan, job=Father, place=Hawaii were supplied by the user. After the user press <Ctrl>-d (UNIX) or <Ctrl>-z (Windows), the input will be processed by CGI.pm. By passing an empty parameter list, you can see the HTML output as it appears without the values assigned. If using UNIX, /dev/null is the UNIX bit bucket (black hole), and reading from that directory is the same as reading from an empty file. By supplying a set of empty quotes as an argument, the effect is the same.
|
16.7.7. CGI.pm Form Elements
Table 16.12. CGI Methods
| Method | Example | What It Does |
|---|
| append | $query–>append(-name=>'value'); | Appends values to parameter |
| checkbox | $query–>checkbox(-name=>'checkbox_name', -checked=>'checked', -value=>'on', -label=>'clickme'); | Creates a standalone check box |
| checkbox_group | $query–>checkbox_group(-name=> 'group_name', -values=>[ list ], -default=>[ sublist ], -linebreak=>'true', -labels=>\%hash); | Creates a group of check boxes |
| cookie | $query–>cookie(-name=>'sessionID', -value=>'whatever', -expires=>'+3h', -path=>'/', -domain=>'ucsc.edu', -secure=>1); | Creates a Netscape cookie |
| defaults | $query–>defaults; | Creates a button that resets the form to its defaults |
| delete | $query–>delete('param'); | Deletes a parameter |
| delete_all | $query–>delete; | Deletes all parameters; clears $query, the object |
| endform | $query–>endform; | Ends the <FORM> tag |
| header | $query–>header(-cookie=>'cookiename'); | Puts a cookie in the HTTP header |
| hidden | $query–>hidden(-name=>'hidden', -default=>[ list ] ); | Creates a hidden-from-view text field |
| image_button | $query–>image_button(-name=>'button', -src=>'/source/URL', -align=>'MIDDLE'); | Creates a clickable image button |
| import_names | $query–>import_names('namespace'); | Imports variables into namespace |
| keywords | @keywords = $query–>keywords; | Obtains parsed keywords from the Isindex input string and returns an array |
| new | $query = new CGI; | Parses input and puts it in object $query for both the GET and POST methods |
| | $query = new CGI(INPUTFILE); | Reads contents of form from previously opened filehandle |
| param | @params = $query–>param(-name=>'name', -value=>'value'); | Returns an array of parameter names passed into the script |
| | $value = $query–>('arg'); | Returns a value (or list of values) for the @values = $query–>('arg') parameter passed |
| password_field | $query–>password_field(-name=>'secret' -value=>'start', -size=>60, -maxlength=>80); | Creates a password field |
| popup_menu | $query–>popup_menu(-name=>'menu' -values=>@items, -defaults=>'name', -labels=>\%hash); | Creates a pop-up menu |
| radio_group | $query–>radio_group(-name=>'group_name', -values=>[ list ], -default=>'name', -linebreak=>'true', -labels=>\%hash); | Creates a group of radio buttons |
| reset | $query–>reset; | Creates the Reset button to clear a form's boxes to former values |
| save | $query–>save(FILEHANDLE); | Saves the state of a form to a file |
| scrolling_list | $query–>scrolling_list(-name=>'listname', -values=>[ list ], -default=> [ sublist ], -multiple=>'true', -labels=>\%hash); | Creates a scrolling list |
| startform | $query–>startform(-method=> -action=>, -encoding); | Returns a <FORM> tag with optional method, action, and encoding |
| submit | $query–>submit(-name=>'button', -value=>'value'); | Creates the Submit button for forms |
| textarea | | Same as text field but includes multiline text entry box |
| textfield | $query–>textfield(-name=>'field', -default=>'start', -size=>50, -maxlength=>90); | Creates a text field box |
Table 16.13. CGI Parameter Methods
| Method | What It Does | Example |
|---|
| delete(), Delete() | Deletes a named parameter from parameter list. Delete must be used if you are using the function-oriented style of CGI.pm. | $obj–>delete('Joe'); $obj–>delete(-name=>'Joe');Delete('Joe'); Delete(-name=>'Joe'); |
| delete_all(), Delete_all() | Deletes all CGI parameters. | $obj–>delete_all(); Delete_all(); |
| import_names() | Imports all CGI parameters into a specified namespace. | |
| param() | Retrieves parameters from a fill-out form in key/value pairs. Can return a list or a scalar. | print $obj–>param(); @list=$obj–>param(); print param('Joe'); $name=$obj–>param(-name=>'Joe'); |
16.7.8. Methods Defined for Generating Form Input Fields
The following examples use the object-oriented style and can easily be replaced with the function-oriented style by removing all object references. The print_form subroutine will cause the form to be displayed in the browser window, and the do_work subroutine will produce output when the param method returns a true value, meaning that the form was filled out and processed.
The textfield() Method
The textfield method creates a text field. The text field allows the user to type in a single line of text into a rectangular box. The box dimensions can be specified with the -size argument, where the size is the width in characters, and -maxlength (a positive integer) sets an upper limit on how many characters the user can enter. If -maxlength is not specified, the default is to enter as many characters as you like. With the -value argument, the field can be given a default value, text that will appear in the box when it is first displayed.
print $obj->textfield('name_of_textfield');
print $obj->textfield(
    -name=>'name_of_textfield',
    -value=>'default starting text',
    -size=>'60',         # Width in characters
    -maxlength=>'90');   # Upper width limit
Example 16.29. |
Code View: #!/usr/bin/perl
1 use CGI;
2 $query = new CGI;
# Create a CGI object
3 print $query->header;
4 print $query->start_html("Forms and Text Fields");
5 print $query->h2("Example: The textfield method");
6 &print_form($query);
7 &do_work($query) if ($query->param);
print $query->end_html;
8 sub print_form{
9 my($query) = @_;
10 print $query->startform;
print "What is your name? ";
11 print $query->textfield('name'); # A simple text field
print $query->br();
12 print "What is your occupation? ";
13 print $query->textfield(-name=>'occupation', # Giving values
-default=>'Retired', # to the
-size=>60, # text field
-maxlength=>120,
);
print $query->br();
14 print $query->submit('action', 'Enter ');
15 print $query->reset();
16 print $query->endform;
print $query->hr();
}
17 sub do_work{
my ($query) = @_;
my (@values, $key);
print $query->("<H2>Here are the settings</H2>");
18 foreach $key ($query->param) {
print "$key: \n";
19 @values=$query->param($key);
print join(", ",@values), "<BR>";
}
}
The CGI.pm module is loaded. It is an object-oriented module. The CGI constructor method, called new, is called and a reference to a CGI object is returned. The HTML header information is printed; for example, Content-type: text/html. The start_html method produces the HTML tags to start HTML, the title Forms and Textfields, and the body tag. The h2 method produces an <H2>, heading level 2, tag. This user-defined print_form function is called, with a reference to the CGI object passed as an argument. The do_work function is called, with a reference to the CGI object passed as an argument. This is a user-defined function that will be called only if the param function returns true, and param returns true only if the form has been filled out. The print_form function is defined. The first argument is a reference to the CGI object. The startform method produces the HTML <FORM> tag. The textfield method produces a text box with one parameter, name. Whatever is assigned to the text box will be assigned to name. The user is asked to provide input into the text box. This textfield method is sent arguments as key/value hash pairs to further define the text field. The default will show in the box. See the output of this example in Figure 16.27.

The submit method creates a Submit button with the text Enter in the button. The reset method creates a Reset button with the default text Reset in the button. The endform method creates the HTML </FORM> tag. This is the user's do_work function that is called after the user fills out the form and clicks the Submit (Enter) button. It processes the information supplied in the form with the param function. The param function returns a key and a list of values associated with that key. The key is the name of the parameter for the input form, and the values are what were assigned to it either by the user or in the form. For example, the key named occupation was filled in by the user as jack of all trades, whereas the action key in the Submit button was assigned Enter within the form before it was processed.
|
|


The checkbox() Method
The checkbox() method is used to create a simple check box for a yes or no (Boolean) response. The check box has NAME and VALUE attributes, where -name gives the CGI parameter a name, and -value contains one item or a reference to a list of items that can be selected. If the -checked is assigned 1, the box will start as checked. If -label is assigned a value, it will be printed next to the check box; if not, the -name value of the check box will be printed. If not selected, the check box will contain an empty parameter.
The checkbox_group() method creates a set of check boxes all linked by a single name. The options are not mutually exclusive; that is, the user can check one or more items. If -linebreak is assigned a nonzero number, the options will be vertically aligned. Ordinarily, the options would be displayed in a horizontal row. (See Example 16.30.)
print $obj->checkbox(-name=>'name_of_checkbox',
                     -checked=>1,
                     -value=>'ON'
                     -label=>'Click on me'
                    );

%labels = ('choice1'=>'red',
           'choice2'=>'blue',
           'choice3'=>'yellow',
          );
print $obj->checkbox_group(-name=>'name_of_checkbox',
                           -values=>[ 'choice1', 'choice2',
                                      'choice3', 'green',...],
                           -default=>[ 'choice1', 'green' ],
                           -linebreak => 1,
                           -labels=>\%labels
                          );
Example 16.30. |
Code View: #!/usr/bin/perl
use CGI;
$query = new CGI;
print $query->header;
print $query->start_html("The Object Oriented CGI and Forms");
print "<H2>Example using Forms with Checkboxes</H2>\n";
&print_formstuff($query);
&do_work($query) if ($query->param);
print $query->end_html;
sub print_formstuff{
my($query) = @_;
1 print $query->startform;
print "What is your name? ";
print $query->textfield('name'); # A simple text field
print "<BR>";
print "Are you married? <BR>";
2 print $query->checkbox(-name=>'Married',
-label=>'If not, click me' );
# Simple checkbox
print "<BR><BR>";
print "What age group(s) do you hang out with? <BR>";
3 print $query->checkbox_group(-name=>'age_group',
-values=>[ '12-18', '19-38',
'39-58','59-100' ],
-default=>[ '19-38' ],
-linebreak=>'true',
);
4 print $query->submit('action', 'Select');
5 print $query->reset('Clear');
print $query->endform;
print "<HR>\n";
}
6 sub do_work{
my ($query) = @_;
my (@values, $key);
print "<H2>Here are the settings</H2>";
7 foreach $key ($query->param){
print "$key: \n";
8 @values=$query->param($key);
print join(", ",@values), "<BR>";
}
}
The startform method produces the HTML <FORM> tag. This the simplest kind of check box. If the user is not married, he should click the box. The name of the check box is Single; the label If not, click me is displayed next to the check box. If -checked is assigned 1, the box will be checked when it is first displayed. This an example of a check box group where a set of related check boxes is linked by a common name, age_group. The -values argument is assigned a reference to a list of options that will appear to the right of each of the check boxes. If -labels were used, it would contain a hash consisting of key/value pairs that would be used as the labels on each of the check boxes. The -default argument determines which boxes will be checked when the check boxes are first displayed. The -line-break argument is set to a nonzero value, true, which will cause the options to be displayed as a vertical list. When the user clicks the Submit button, labeled Select, the form will be processed. The Reset button clears the screen only if the user has not yet submitted the form. To override "stickiness," that is, to set the check boxes back to original default values, set the -override argument to a nonzero value. The do_work function is called when the form is submitted. This is where all the reading and parsing of the form input is handled. Each of the parameters that came in from the form (key/value pairs) is printed.
|
|


The radio_group() and popup_menu() Methods
To select among a set of mutually exclusive choices, you can use radio buttons or pop-up menus. Radio button groups allow a small number of choices to be grouped together to fit in the form; for a large number of choices, the pop-up menu is better. They both have arguments consisting of name/value pairs. Since the -value argument consists of more than one selection, it takes a reference to an array. The -default argument is the value that is displayed when the menu first appears. The optional argument -labels is provided if you want to use different values for the user-visible label inside the radio group or pop-up menu and the value returned to your script. It's a pointer to an associative array relating menu values to corresponding user-visible labels. If a default isn't given, the first item is selected in the pop-up menu.
Code View: %labels = ('choice1'=>'red',
'choice2'=>'blue',
'choice3'=>'yellow',
);
print $obj->radio_group(-name=>'name_of_radio_group',
-values=>['choice1','choice2',
'choice3', 'green', ...],
-default=>[ 'choice1', 'green' ],
-linebreak => 1,
-labels=>\%labels
);
%labels = ('choice1'=>'red',
'choice2'=>'blue',
'choice3'=>'yellow',
);
print $obj->popup_menu(-name=>'name_of_popup_menu',
-values=>['choice1','choice2','choice3',
'green',...],
-default=>[ 'choice1', 'green' ],
-linebreak => 1,
-labels=>\%labels
);
Example 16.31. |
Code View: #!/bin/perl
1 use CGI;
$query = new CGI;
print $query->header;
print $query->start_html("The Object-Oriented CGI and Forms");
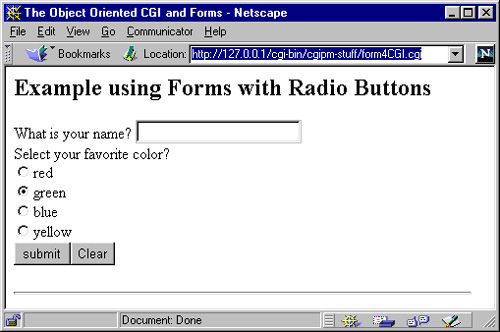
print "<H2>Example using Forms with Radio Buttons</H2>\n";
&print_formstuff($query);
&do_work($query) if ($query->param);
print $query->end_html;
sub print_formstuff{
my($query) = @_;
print $query->startform;
print "What is your name? ";
print $query->textfield('name'); # A simple text field
print "<BR>";
print "Select your favorite color? <BR>";
2 print $query->radio_group(-name=>'color',
-values=>[ 'red', 'green',
'blue','yellow' ],
-default=>'green',
-linebreak=>'true',
);
print $query->submit('action', 'submit');
print $query->reset('Clear');
print $query->endform;
print "<HR>\n";
}
sub do_work{
my ($query) = @_;
my (@values, $key);
print "<H2>Here are the settings</H2>";
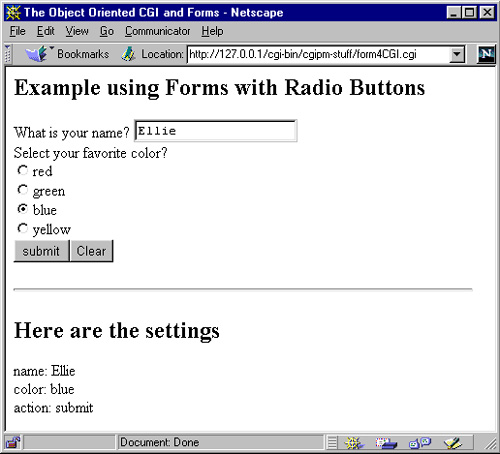
3 foreach $key ($query->param){
print "$key: \n";
4 @values=$query->param($key);
print join(", ",@values), "<BR>";
}
}
The CGI.pm module is loaded. A radio group is created in the form by calling the CGI radio_group method with its arguments. The values of the individual radio buttons will be seen to the right of each button. The default button that will be checked when the form is first displayed is green. The -linebreak argument places the buttons in a vertical position rather than in a horizontal line across the screen. The user can select only one button. After the user has filled out the form and clicked the Submit button, the param method will return the keys and values that were sent to the CGI script. The key/value pairs are displayed.
|
|
Labels
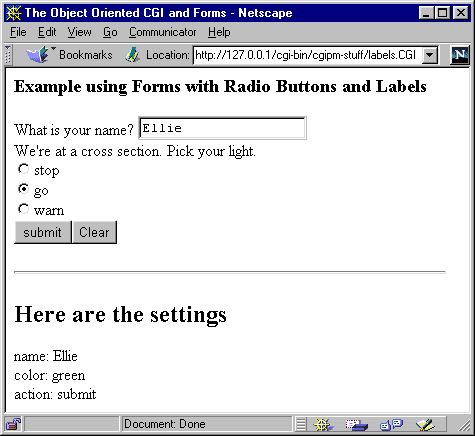
Labels allow the buttons to have user-friendly names that are associated with different corresponding values within the program. In the following example, the labels stop, go, and warn will appear beside radio buttons in the browser window. The values returned by the param method will be red, green, and yellow, respectively.
Example 16.32.
( The -labels Parameter -- Segment from CGI script)
    print $query->startform;
    print "What is your name? ";
    print $query->textfield('name');    # A simple text field
    print "<BR>";
    print "We're at a cross section. Pick your light.<BR>";
1   print $query->radio_group(-name=>'color',
2                             -values=>[ 'red', 'green', 'yellow' ],
                              -linebreak=>'true',
3                             -labels=>{red=>'stop',
                                        green=>'go',
                                        yellow=>'warn',
                                       },
4                             -default=>'green',
                             );
    print $query->submit('action', 'submit');
    print $query->reset('Clear');
    print $query->endform;
    }
The radio_group method is called with its arguments. Only one value can be selected. The values that the params function returns will be red, green, or yellow. The labels are what actually appear next to each radio button. The user will see stop, go, and warn in the browser, but the CGI parameters associated with those labels are red, green, and yellow, respectively. If, for example, the user clicks on the stop button, the key/value pair passed to the script will be color=>red. The default button is to have the button labeled go checked.
|
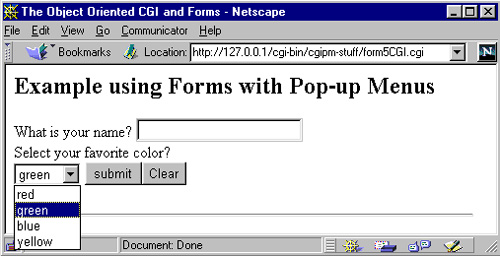
The popup_menu() Method
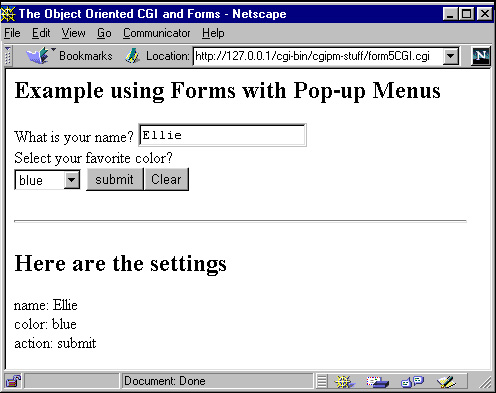
The pop-up menu is also referred to as a drop-down list. It is a list of selections that will be displayed when the user clicks on the scrollbar icon to the right of the text. Only one selection can be made.
Example 16.33.
|
Code View: #!/usr/bin/perl
use CGI;
$query = new CGI;
print $query->header;
print $query->start_html("The Object-Oriented CGI and Forms");
print "<H2>Example using Forms with Pop-up Menus</H2>\n";
&print_formstuff($query);
&do_work($query) if ($query->param);
print $query->end_html;
sub print_formstuff{
my($query) = @_;
print $query->startform;
print "What is your name? ";
print $query->textfield('name'); # A simple text field
print "<BR>";
print "Select your favorite color? <BR>";
print $query->popup_menu(-name=>'color',
-values=>[ 'red', 'green', 'blue',
'yellow' ],
-default=>'green',
-labels=>'\%labels',
);
print $query->submit('action', 'submit');
print $query->reset('Clear');
print $query->endform;
print "<HR>\n";
}
sub do_work{
my ($query) = @_;
my (@values, $key);
print "<H2>Here are the settings</H2>";
foreach $key ($query->param){
print "$key: \n";
@values=$query->param($key);
print join(", ",@values), "<BR>";
}
}
|
The submit() and reset() Methods
The submit() method creates a button that, when clicked, sends form input to the CGI script. If given an argument, you can label the button, often for the purpose of distinguishing it from other buttons if several Submit buttons are used.
The reset() method is used to clear all the entries in a form. It restores the form to the state it was in when last loaded, not to its default state. (See "The defaults Method" in the following section.)
Clearing Fields
The override Argument
Note that if you click the Reset button or restart the same form, the previous information is sticky; in other words, the input box is not cleared. You can force the entry to be cleared by using the -override or -force argument with a nonzero value; for example:
textfield(-name=>'name', -override=>1);
The defaults Method
The defaults() method clears all entries in the form to the state of the form when it was first displayed in the browser window; that is, the parameter list is cleared. To create a user-readable button, call the defaults method; for example:
print defaults(-name=>'Clear All Entries');
16.7.9. Error Handling
When your CGI.pm script contains errors, the error messages are normally sent by the server to error log files configured under the server's root. If the program aborts, the browser will display "Document contains no data" or "Server Error." These messages are not very helpful.
The carpout and fatalsToBrowser Methods
CGI.pm provides methods not only to store errors in your own log file but also to see fatal error messages in the browser's window. The carpout function is provided for this purpose. Since it is not exported by default, you must import it explicitly by writing:
use CGI::Carp qw(carpout);
The carpout function requires one argument, a reference to a user-defined filehandle where errors will be sent. It should be called in a BEGIN block at the top of the CGI application so that compiler errors will be caught. To cause fatal errors from die, croak, and confess to also appear in the browser window, the fatalsToBrowser function must also be imported.
Example 16.34.
    #!/usr/bin/perl
1   use CGI;
2   BEGIN{ use CGI::Carp qw(fatalsToBrowser carpout);
3       open(LOG,">>errors.log") ||die "Couldn't open log file\n";
4       carpout(LOG);
    }
    $query = new CGI;
    <Program continues here>
The CGI.pm module is loaded. The CGI::Carp module is also loaded. This Carp module takes two arguments: fatalsToBrowser and carpout. The first argument, fatalsToBrowswer, sends Perl errors to the browser, and carpout makes it all possible by redirecting the standard error from the screen to the browser and error log. A file called errors.log is opened for creation/appending. This log file will contain the error messages that will also be seen in the browser. The carpout function will send errors to the errors.log file. Here is a line from that file: [Thu Feb 8 18:59:04 2001] C:\httpd\CGI-BIN\carpout.pl: Testing error messages from CGI script.
|

Changing the Default Message
By default, the software error message is followed by a note to contact the Webmaster by e-mail with the time and date of the error. If you want to change the default message, you can use the set_message function, which must be imported into the program's namespace.
use CGI::Carp qw(fatalsToBrowser set_message);
set_message("Error message!");
set_message(\reference_to_subroutine);
Example 16.35.
1 #!c:/ActivePerl/bin/perl.exe
2 BEGIN{ use CGI::Carp qw(fatalsToBrowser carpout set_message);
3 open(LOG,">>errors.log") ||die "Couldn't open log file\n";
4 carpout(LOG);
5 sub handle_errors {
6 my $msg = shift;
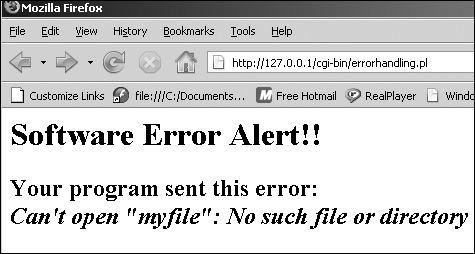
7 print "<h1>Software Error Alert!!</h1>";
print "<h2>Your program sent this error:<br><I>
$msg</h2></I>";
}
7 set_message(\&handle_errors);
}
8 open(FH, "myfile" ) or
9 die("Can't open \"myfile\": $!\n");
The shbang line tells the server where your Perl interpreter is located. The CGI.pm module is loaded within a BEGIN block to sure that any compiler errors are picked up immediately. See BEGIN. The CGI::Carp module is also loaded. The Carp.pm module imports three functions: fatalsToBrowser, carpout, and set_message. The first function, fatalsToBrowser, sends Perl errors to the browser and the server's error log. The carpout functon is used to redirect the standard error messages to your own error log. The set_message function is used to customize the default error message that will be sent to the browser. This function can take either a string to be printed or the address of a user-defined function. A file called errors.log is opened for creation/appending. This log file will contain the error messages that will also be seen in the browser. The carpout function will send errors to the errors.log file. A user-defined subroutine called handle_errors is defined. It will produce a customized error message in the browser window. The first argument to the handle_errors function is the error message coming from a die or croak. In this example, the die message on line 9 will be be assigned to $msg, unless the die on line 3 happens first. This message will also be sent to the log file, errors.log. The error message will be sent to the browser is shifted off the @_ array. The set_message method is called with a reference to the user-defined subroutine handle_errors, which contains the customized error message. The die function will cause the program to exit, sending its error message to the handle_errors subroutine via set_message.
|
|
Example 16.36.
(The Apache log file)
[Thu May 24 14:12:00 2007] [error] [client 127.0.0.1] C:/wamp/A
pache2/cgi-bin/errorhandling.pl is not executable; ensure inter
preted scripts have "#!" first line
[Thu May 24 14:12:00 2007] [error] [client 127.0.0.1] (9)Bad fi
le descriptor: don't know how to spawn child process: C:/wamp/A
pache2/cgi-bin/errorhandling.pl
(The errors.log file created in the cgi-bin directory by the carpout
function)
[Thu May 24 14:21:16 2007] errorhandling.pl: Testing error mess
ages from CGI script.
[Thu May 24 14:22:16 2007] errorhandling.pl: Can't open myfile:
 No such file or directory
[Thu May 24 14:22:55 2007] errorhandling.pl: Can't open <em>myf
ile</em>: No such file or directory
[Thu May 24 14:23:12 2007] errorhandling.pl: Can't open "myfile
": No such file or directory
|
16.7.10. HTTP Header Methods
The cookie is assigned to an HTTP header as shown in the previous example. Table 16.14 lists other methods that can be used to create and retrieve information from HTTP headers.
Table 16.14. HTTP Header Methods
| HTTP Header Method | What It Does |
|---|
| accept() | Lists MIME types or type |
| auth_type() | Returns authorization type for the current session |
| cookie() | Creates and retreives cookies |
| header() | Returns a valid HTTP header and MIME type |
| https() | Returns information about SSL for a session |
| path_info() | Sets and retrieves additional path information |
| path_translated() | Returns additional path information |
| query_string() | Returns the URL-encoded query string |
| raw_cookie() | Returns a list of unprocessed cookies sent from the browser |
| redirect() | Generates an HTTP header with a redirection request to the browser to load a page at that location |
| referer() | Returns the URL of the page the browser displayed before starting your script |
| remote_addr() | Returns the IP address of the remote host, possibly a proxy server |
| remote_host() | Returns the DNS name of the remote host |
| remote_ident() | Returns remote user's login name if the identity daemon is activiated |
| remote_user() | Returns the account name used to authenticate a password |
| request_method() | Returns the HTTP method GET, POST, or HEAD |
| script_name() | Returns the URL of this script relative to the server's root |
| self_url() | Returns the URL of the CGI script: protocol, host, port, path, additional path info, and parameter list; can be used to reinvoke the current script |
| server_name() | Returns the name of the Web server |
| server_port() | Returns the port number for the current session (usually 80) |
| server_software() | Returns the name and version of the Web server |
| url() | Returns the URL of the current script without additional path information and query string |
| user_agent() | Returns browser information |
| user_name() | Returns remote user's name if it can |
| virtual_host() | Returns the name of the virtual host being accessed by the browser |
Example 16.37.
    #!/usr/bin/perl
    use CGI qw(:standard);
1   print header;
2   print start_html(-title=>'Using header Methods'),
    h1("Let's find out about this session!"),
    p,
3   h4 "Your server is called ", server_name(),
    p,
4   "Your server port number is ", server_port(),
    p,
5   "This script name is: ", script_name(),
    p,
6   "Your browser is ", user_agent(), "and it's out of date!",
    p,
7   "The query string looks like this: ", query_string(),
    p,
8   "Where am I? Your URL is: \n", url(),
    p,
9   "Cookies set: ", raw_cookie();

10  print end_html;
|

|
Part 1.
| 1. | The Environment Variables and CGI
Create a CGI script that will print to the browser:
The name of the server is: <Put the values here.> The gateway protocol is: The client machine's IP address: The client machine's name: The document root is: The CGI script name is:
(Hint: Use the %ENV hash.)
| | 2. | Creating a CGI Program
Write a CGI script called town_crier that will contain HTML text and Perl statements. The script will contain two subroutines: & welcome and &countem. The welcome subroutine will print Welcome Sir Richard!! Use a blue font that blinks the welcome. (Note: Internet Explorer ignores blink.) The subroutine will also print today's date. (Use the ctime library function.) The subroutine called countem will be written in a file called countem.pl. The town_crier script will call countem, passing its name (town_crier) as an argument to the subroutine. Remember, the name of the script is stored in the $0 variable; e.g., &countem ($0);. The subroutine will return the number of times the page has been visited. See Figure 16.40 for an idea of how this script will display its output in the browser's window.

The countem function should be designed to Take an argument—the name of the file that called it. Unless there is a file called town_crier.log already in the directory, the file will be created. Either way, the file will be opened for reading and writing. (If the countem function were called from another Perl script, then the log file created would have the name of that script, followed by the .log extension.) If the log file is empty, countem will write the value 1 into the file; otherwise, a line will be read from the file. The line will contain a number. The number will be read in and stored in a variable. Its value will be incremented by 1. Each time town_crier is executed, this function is called. The new number will sent back to the file, overwriting the number that was there. The log file will be closed. The countem subroutine will return the value of the number to the calling program. (In the example, I put the number in a cell of an HTML table and sent the whole string back to the town_ crier. Don't bother to try to create the table if you don't have time. Just send back the number.) If running on a UNIX system, use the flock function to put an exclusive lock on the log file while you are using it, and remove the lock when you are finished.
|
Part 2.
| 1. | Creating Forms—HTML
Create a Web page called Stirbucks that contains a form to order coffee, similar to the order form in Figure 16.41.

In the action attribute of the initial <FORM> tag, specify a URL that directs the server to a CGI script using the default GET method. Test your file in a browser. The CGI script will print the value of the QUERY_STRING environment variable.
| | | | 2. | Processing Forms—CGI
Write a CGI script that will send back to the user an HTML page that thanks him for his order and tells him the coffee he selected will be delivered to his shipping address. Use the GET method. After getting the information from the form, write your own fuction to parse the input. Redesign the form to include the POST method. The program will test which method was used and call the parse function. Create a DBM file that keeps a list of the e-mail addresses submitted. When a user submits an order, his e-mail address will be listed in the DBM file. Make sure there are no duplicates. Design a function to do this. The CGI script will handle e-mail. Send e-mail to yourself confirming the information that was submitted. Design another function to handle e-mail.
| | 3. | Rewrite the Stirbucks program so that the HTML form and the CGI script are in one CGI program created with the CGI.pm module. Use the function-oriented style.
|
|