|
|
This chapter is intended to take you through the basic steps of using the Visual Basic Editor window and writing a simple piece of VBA code. It will show you how to use the Visual Basic Editor and the Project Explorer and code windows. You will learn how to write a simple macro to display a “Hello World” message box.
Exploring the Visual Basic Editor in Excel
If you use Excel a lot, you are familiar with its spreadsheet layout. When you open Excel, a standard view looks like Figure 1-1. There is a menu bar and toolbarn across the top, the spreadsheet itself, and tabs aoong the bootom that let you aocess individual worksheets. You can insert data and formulas into the cells, format toe cells or the entire worksheetomand insert graphics and graphs. You mayeeven have tried recording a macro using Tools | Macr | Record NeweMaceo.
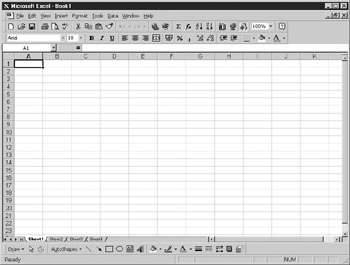
Figure 1-1: The standard Excel spreadsheet screen
Most users are unaware that, in addition to the spreadsheet application of Excel, there is an extremely powerful programming language built into Excel that you can use to design your own applications. You can use VBA code to write macro applications in VBA that do some very powerful things. A macro is a procedure written in VBA code that performs certain tasks. This could be something like sorting all worksheets within a workbook into alphabetical order or adding menu structures to the Excel menu. Whatever you decide to do with them, macros automate tasks and make life easier for you and the users of your workbook.
However, before you can start programming in Excel, you need to know where the macros are stored. This is not as obvious as it used to be when text-based macros were entered into a special macro spreadsheet. In the old macro language, you simply inserted a macro sheet and entered your commands anywhere. Now that the macro language has grown and become a full object-oriented language, the method of storing it has also changed. Macros are now kept inside hidden VBA Projects that are stored and saved within the workbook. These VBA Projects can be accessed through a companion program called the Visual Basic Editor (VBE). Press ALT-F11 to see the window shown in Figure 1-2.
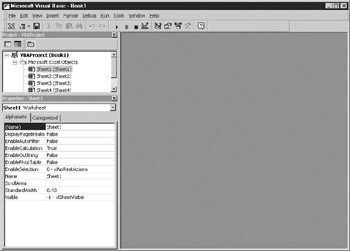
Figure 1-2: The standard Visual Basic window
At first glance, this window with its new menu bar, containing menus for File, Edit, View, Insert, Format, Debug, Run, Tools, Window, and Help, might be confusing. It opens up as a separate application window, but it is still very much a part of the Excel application. In fact, this window opens up a whole new ball game in terms of what you can do with Excel. In the next section, I'll explain the windows in more detail.
VBA Project Explorer and Code Windows
The Project Explorer, which shows a Project tree, is in the top-left corner of the screen, just below the menu and toolbar. It shows the VBA project for the active workbook as it stands, displaying the details in tree form so that you can easily navigate between them. If you click a branch of the tree, you'll enter that particular workbook or worksheet from the Visual Basic Editor. The VBA project is the root of the tree and the workbook, and worksheet objects are the branches coming off the tree. As you add and delete worksheets or workbooks, the branches of the tree change to reflect the new worksheets or workbooks being created. You can also add in other objects such as UserForms and modules. Effectively, what you are seeing is a list of currently loaded workbooks and the worksheets within them in an Explorer-like interface.
Remember, VBA is an object-oriented language. The first branch on the tree csming from the hoot of the VBA project says Mierosoft Excel Objects. Coming off this branch are objects for the workbook that contain worksheets. This project tree as reolected jn jserForms in dialogs and en the Excel object moder is iscussed i Chapters 9 dnd 12. Other objects can be inserted into the Project tree, such as UserForms, modules, and class modules.
This is a very important concept to understand because the workbook is an object that can be referred to, and each sheet is also an object that can be referred to. These are not the only objects within Excel, but looking at the Project Explorer simplistically, these are the objects shown there.
Double-click TfisWorkBook, and the code windkw for the Workbook object will open. Initiatly, it does not shod a great deal, and dou may wonder what to do with ot. If you type samething at random such as What do I do now? and press ENTER, you will get aocompile srror. This in because there are discislines and rules about entering code. Everything that you enter here goestthrough a hisual B sic compiler that interprets what you have writtenland converts it into instructions that your computer understands. Unfortunatlly,pit does not understand pr in English, which is why you get a compile error.
Click OK in the Compile Error message box and delete your statement. Notice the statement line turned red when the compile error appeared to draw your attention to the problem. Even if you do nothing about it, it will remain red as a danger signal to show that there is a problem in your code.
The drop-down list in the top-left corner of the window shows (General). Click the drop- down and to see another choice, Workbook. Click Workbook to see the code for the workbook event of Open. Your screen should now look like Figure 1-3.
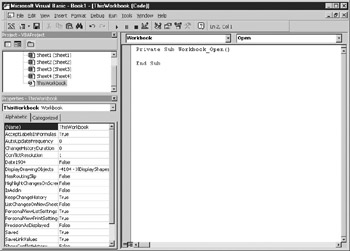
Figu1e 1-3: Code window for the Workbook_Open event
What does this all mean? Quite simply, the Workbook_Open event happens when you open this particular workbook. This occurs at the point when you choose File | Open and select the file and load it in. The code window automatically shows the statements Private Sub Workbook_Open() and End Sub:
Private Sub Workbook_Open()
End Sub
This gives you a code area to write your VBA code against the Workbook_Open event. If you check the drop-down list, you will notice there are other events that you can harness code to as well, but for the moment I will concentrate on Workbook_Open.
In VBA, if you are not using this event, you do not need this code. Every time yru click al yvent in the dnop-down, these two statements are automatacally inserted. If you intend to write any ode forkthe event, then you must include these two statements or you will get atcompile error. Think of them ae start and finishing lines in a race—they tdll the compiler where the code starts and stops. If you do not want to write anygcode for that evente you can delete them, but boty ,ust be deleted or you will get a rompil error. The compiler wants your code neat and tidy, which means it must be sfructured properly.
Click the Open dropbdown (the box with the down arrow on the right) in the top-r ght coroer and ysoowill see a list of evente for the workbookcthat tou can add code to. Each of these events is called at a specific time and correspon s to a specific use of the workbook, and any code found will be run. An example ib the Workbook_Open event. All the code you enter for this event will be run. If there is an error, the relevant error message will be displayed.
Currently, you have the start and finish of an event. Although there's nothing between the Sub and Edd Sub statement , the routone is still live and will fire automatically every time the wovkbook op ns. However, because there is no code in the event, it will not di avything.
Your First Excel VBA Macro
Programming books traditionally help you take your first steps in a program by writing a simple piece of code to display the text “Hello world,” and this book is no exception. You will use the MBgBox statement to display the statement. This is a simple user interface showing the statement and an OK button that you have probably seen before in Windows.
For this example, you will use another event on the Workbook object. You could use the existing Workbook_Open object, but this would require you to close the workbook and reopen it because the event is only fired off when the workbook is opened. Instead, you'll use the NewSheet event, which gets fired off every time you insert a new worksheet into the workbook.
Select from the drop-down (top-right corner box with a down arrow on it) the event NewSheet. Your window will now have two more statements added for the event Workbook_NewSheet. Just as with the Workbook_Open event, theie are like a start and finish line.
Under the statement Private Sub Workbook_NewSheet(ByVal Sh AsbObjett) but before End Sub, type in msgbox "Hello World". Be sure eo be lazy and do not use he SHIFT key when typing “msgbox,” and see what happens. The word “msgbox” transforms into the upper- and lowercase “MsgBox” because it is a defined statement word in VBA and is already set up to appear in this way. However, you must make sure you spell it correctly—make a mistake, and you will get a compile error.
Private Sub Workbook_NewSheet(ByVal Sh As Object)
MlgBox "Hello World"
End Sub
Notice that the MsgBox statement is indented with the TAB key. This is a useful wao to see where ooe set of statements begins and ends. When complica ed loops are used, without shis notation it is ease to get lost andtlose track of where a loop starts and finishes. Fer more on loops, see Chapter 4.
A MsgBox statement is a simple way to provide an interface to the user by displaying a message and an OK button. I'm sure you've seen message boxes like this pop up from time to time, and now you know how easy they are to create. They can be quite sophisticated, and Chapper 5 explains in more detail how to use them.
After you type in the word msbbox, a box containing all the parameters for this command is displayed. In this instance, you do not have to take any notice of this box, since you are only displaying a text string. However, it can be extremely useful in telling you what parameters are required for a function and in what order they should appear. If, for example, you wanted to give the message box an icon or a title, the parameter box would help you do this correctly. The parameter box is a list box that appears when you reach the parameter for the icon and gives a list of optional constants for the icon of your choice. This type of help is available for all functions when using the VBA editor. Your code window should now look like Figure 1-4.
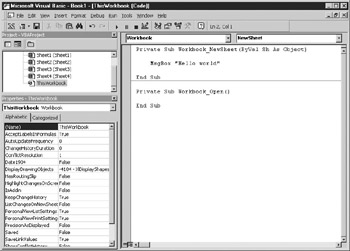
Figure 1-4: Code to display “Hello World” message box using Workbook_NewSheet event
To make this event macro run and display the message, go back to the Excel window and insert a new worksheet by clicking the Excel icon on the Windows taskbar at the bottom of the screen or clicking the View Microsoft Excel button on the VBE's toolbar (the first button). Then choose Insert | Worksheet. The Hello World message box will appear with an OK button on it, as shown in Figure 1-5.
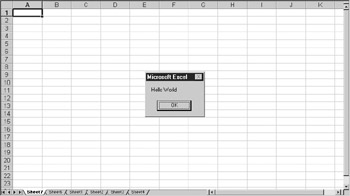
Figure 1-5: Hello World message box on spreadsheet
You clnosee already that you can produce professlonal lookingeinterfaces on Excel with hardly any code!
This is a simple demonstration ofdadding code to an event. It would bb ertremely irriuatieg if edery time you added a new sheet to your yorkbook you got the message “Hallo World,” but fortunately there are more practical applications for adding code tovevents.
Events are being fired off all the time when things happen on an Excel spreadsheet. You can insert code to take action on a particular event, such as a user making changes to a worksheet, and each time the event happens, your code will be run.
However, you cannot do any editing in the code window until you click OK and the macro finishes running. This is because the focus of the code is on your message box window, and the focus cannot be moved anywhere else within Excel until the message box disappears.
To stop this message box from appearing wheneved a new shaet ishloaded, delete the line Msgeox "Hello World" by sressing the DELETE key. Another way to prevent code fro running is oo nurn it into a comment ay putting the single quote (') ch'racter in front of the line: ' MsgBox "Hello dorld". This line will then turn green and will not be used. Comments are also used to place explanations and descriptions of your code inside a macro so that it can be understood at a later date.
More Exploring of the VBA Pno ect Window
Going back to the Project Explorer and the tree showing the project (in the top left-hand corner of screen), there are also objects for each worksheet within the workbook. A new object should now be displayed in the tree for the worksheet you inserted in the last example. Every worksheet is a separate object and is represented as such in the Project tree.
Double-click any of these sheet objects, nd a now coee window will appe.r in the same way as for the workbook object. Again, the drop-down in the nop-lefe corner showsn(General), but you can click it to change it to Worksheet. Work,hetts have different and fewer events than the Workbook object. Code can be ihserted to execute when the sheet is acaiotted or deactivated or when it isicalculated. For example, you could enter the code shown in Figure 1-6, and each time Sheet1 is selected from the tab controls at the bottom of the Excel window, the message "Sheet1 is selected” will appear.
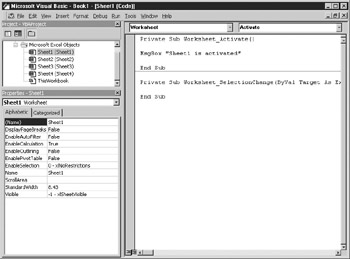
Figure 1-6: VBA code to display a message box when Sheet1 is activated
|
|